I’ve been impressed with the Vertcoin community. It feels like there is a sense of direction, and that everyone is doing there best to have the coin succeed.
To help others get started I documented the steps I went through with my NVIDIA 1060’s on Ubuntu.
Note: This tutorial only works for NVIDIA cards.
The basis for these steps were from this video. You can follow along in the video, and then refer back here for the commands to cut and past.
Generally speaking, we are going to install some prerequisite software (NVIDIA’s CUDA), create directory for ccminer, pull down the code from github (a repository for open source developers), compile, connect to a pool, and start mining!
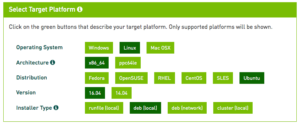
- For the mining software, ccminer, to do its thing you need to install software from NVIDIA.To get the download link go here, and then choose your platform. Below are the selections I made for my system.
 A download link will be generated. Now you can download it locally, or you can copy the link and do a wget as follows. Make sure you cd to the directory you want the ~2GB file in. Note: The URLs and filenames referenced below are what is available a the time of posting. As time goes on you likely will need to use different addresses and as a result filenames.
$ wget https://developer.nvidia.com/compute/cuda/8.0/Prod2/local_installers/cuda-repo-ubuntu1604-8-0-local-ga2_8.0.61-1_amd64-deb
Now lets install CUDA:
$ sudo dpkg -i cuda-repo-ubuntu1604-8-0-local-ga2_8.0.61-1_amd64.deb
$ sudo apt-get update
$ sudo apt-get install cuda
You can then delete the file you downloaded.
- Just in case you haven’t installed git yet, let’s try and install it. If it is already installed nothing bad will happen, and you practiced typing.
$ sudo apt-get install git
- For convenience, I like to place these directories on my desktop. Here’s how to do that, and then change directory into it.
$ mkdir ~/Desktop/vertcoin-ccminer/
$ cd ~/Desktop/vertcoin-ccminer
- Now pull down the source code into this directory and change directory again into a subdirectory that git created.
$ git clone https://github.com/tpruvot/ccminer.git
$ cd ccminer
- Pull down some more supporting libraries before we compile this bad boy. You could have done this from another directory or at an earlier step. But makes sense here conceptually as we need it for the next following step.
$ sudo apt-get install libcurl4-openssl-dev libssl-dev libjansson-dev automake autotools-dev build-essential
- This is where we start getting into voodoo. You need to make sure you cut an paste the following commands properly – particularly the configure one. Typos will cause things to fail. Between each of the following commands you will see lots of configuration code go. I comment each of the lines with a # – that means ubuntu will ignore what follows it (i.e. it won’t execute it). If you want to high-level view of the gory details on compilation you can click here.
$ ./autogen.sh # this builds a configure script tuned for your system
$ ./configure CFLAGS="-O3 -Wall -march=native" # this sets compilation flags in the script autogen made
$ ./build.sh # lots of compilation commands should fly by, and when done you should be returned to a prompt with no errors
- Awesome! Now we just start mining!You can try the following briefly and see that it works. Hopefully you will see progress.
$ ./ccminer -a lyra2v2 -o stratum+tcp://208.113.166.44:9171 -u VrdExKvWGUct8o1icbsrPSt92BUGWSxhax -p passwordnotneeded
Once it starts going, you need to hit CTRL+C and/or CTRL+X to cancel.
Your next step is to change the bolded fields to be a mining pool you like (though I’m partial to the one listed) and create a wallet for yourself.