Troubleshooting When GPUs Don’t Show Up

I’ve built a few rigs, and seem to run into problems when added fourth, fifith, and sixth GPUs.

Generally speaking there are a few things to try.

  • When building a rig, don’t add all the GPUs at once.  Add them one at a time and make sure they show up incrementally.  It makes troubleshooting much easier.
  • Go into the BIOS and find the PCI area.  See if there is an option talking about multiple GPUs or cryptocurrency mining.
  • Go into the BIOS and see if your motherboard has a section that shows you per PCI slot if a card is detected.
  • Go into the BIOS under PCI area and set PCI speed to “Generation 1.”
  • Others online speak to having to clear the CMOS (BIOS) memory after each GPU add.  This usually involves shorting two jumpers on the motherboard – you will have to read your manual.  You may also have to readjust your boot order.  I tried this once, and Ubuntu complained until I reordered the boot disks.  I consider this effort a last resort.
  • Double check all of your connections and that you are supplying power to the card.  If you are using PCI risers try swapping cables or trying different PCI slots methodically.  This will let you determine if an individual piece is bad, or if you are running into a motherboard limit.
  • See if you can get a clue from the syslog file.  Look to see if the log is being perpetually written to, or something video related you can do more research on.
    $ tail -f var/log/syslog
  • Sometimes getting the manufacturer of the card helps.
    lspci -knn | grep VGA -A1
  • Running lspci gives you a lot of raw information of what is connected to your system. Can be useful in some situations.

Six GPUs on MSI Z170A Gaming Motherboard


Got a deal on a few 1060 3GBs via the GPU price watching site gpugarden.  At the moment those cards seem to be well-priced for mining Vertcoin.

Had a lot of trouble getting the fifth and six GPU online working on my MSI Z170A initially, but I figured it out and now I am happily mining away.  It was maddening as the card would show up in MSI’s nifty interface, as well as in various commands run in Ubuntu, but would not show up when mining or in NVIDIA’s XServer.

Did some general troubleshooting, which I write about here.

But, the ultimate solution was flashing and configuring the motherboard…HOWEVER drama ensued with Ubuntu (jump to the last step for a potential head’s up).

  1. First, things could be easy for you.  If you have a later version of motherboard all you may have to do is flip a flag in the BIOS for “cryptocurrency”.  Reboot your computer and hold the delete key to get into the BIOS.  Then navigate to: Settings -> Advanced -> PCI Subsystem Settings -> “Above 4G Memory/Crypto Currency mining” -> Enabled.
  2. If you do not see that option, then you may need to flash the BIOS (my case).  Download the updated version from here.  NOTE: The link provided was relative to me, there are M7 type boards.
  3. Put the file onto some sort of USB device.  Most people will use a stick, but I didn’t have any.  I ended up using an SD Card with a USB reader (I know…clever).
  4. Watch this strangely silent video from MSI.
  5. Reboot, and hopefully Ubuntu will load and your card will show up.  BUT, once rebooted, and no matter how I changed the boot order for devices Ubuntu could not locate the boot disk.  I then went through procedures to repair the stick using Live CD, but that failed.  Somehow along the way my USB stick that I had the Ubuntu OS on died.  I ended up having to reinstall Ubuntu.  Not a big deal for me, as I took the opportunity to get a clean install on a new SSD I purchased.  However, for you it could be an existential crisis.

My Ubuntu Bag of Tricks

    These are commands that I commonly find myself using when trying to manage mining rigs. Perhaps you will find them useful as well!
    • Different ways to transfer files and directories between hosts using scp. scp stands for secure copy. It copies the files over the ssh protocol.

      Send a file from your local host to a remote host:

      scp file.txt username@remotehost:/some/remote/directory

      Send a file from a remote host to your local host:

      $ scp username@remotehost:file.txt /some/local/directory

      Copy files between two remote hosts:

      $ scp username@remotehostx:/some/remote/directory/file.txt username@remotehosty:/some/remote/directory/

      Copy a local directory to a remote host:

      $ scp -r local_folder username@remotehost:/some/remote/directory/destination/
    • Get the sha256 hash of a file on a mac. Sometimes when you download software they will show a big long list of characters. This is a unique signature for the file, and after you download the file you can see if you can check to see if you get the same signature locally. This comes in handy when you download critical software (in my case a crypto coin wallet for Vertcoin).
      $ openssl sha -sha256 filename_of_interest
    • Log a website’s performance over time using a Mac’s terminal and some fancy commands.
      $ while sleep 360; do curl -s -w '\nLookup time:\t%{time_namelookup}\nConnect time:\t%{time_connect}\nPreXfer time:\t%{time_pretransfer}\nStartXfer time:\t%{time_starttransfer}\n\nTotal time:\t%{time_total}\n' -o /dev/null http://208.97.140.30:7903/static/ > latency_output && date > latency_output; done
      

      Fields in bold you need to change to your own, with the first being how many seconds between attempts, the second being what URL you are interested in, and then the third is the name of the file you want the output to be stored in.

      To follow along on the progress, open up another terminal window and run the following against the output file.

      $ tail -f latency_output
      

      Again, change the bolded filename to what you named it in the command before this one.

      References: 1 2

    • To change your hostname (requires a reboot), edit the following two files
$ sudo nano /etc/hostname
$ sudo nano /etc/hosts
  • For a given process id determine what the full path is
    $ sudo ls -l /proc/WHATEVER_THE_PROCESS_IS_ID_IS/exe
  • Pull down only the latest code from a git repository
    $ git clone --depth=1 git@github.com:organization/your-repo.git
  • Other commands I will write about later
    $ spd-say "hello"

Vertcoin Mining with ccminer – Easy Version

I’ve been impressed with the Vertcoin community. It feels like there is a sense of direction, and that everyone is doing there best to have the coin succeed.

To help others get started I documented the steps I went through with my NVIDIA 1060’s on Ubuntu.

Note: This tutorial only works for NVIDIA cards.

The basis for these steps were from this video. You can follow along in the video, and then refer back here for the commands to cut and past.

Generally speaking, we are going to install some prerequisite software (NVIDIA’s CUDA), create directory for ccminer, pull down the code from github (a repository for open source developers), compile, connect to a pool, and start mining!

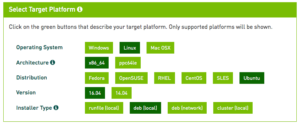
  1. For the mining software, ccminer, to do its thing you need to install software from NVIDIA.To get the download link go here, and then choose your platform.  Below are the selections I made for my system.A download link will be generated.  Now you can download it locally, or you can copy the link and do a wget  as follows. Make sure you cd to the directory you want the ~2GB file in. Note: The URLs and filenames referenced below are what is available a the time of posting. As time goes on you likely will need to use different addresses and as a result filenames.
    $ wget https://developer.nvidia.com/compute/cuda/8.0/Prod2/local_installers/cuda-repo-ubuntu1604-8-0-local-ga2_8.0.61-1_amd64-deb

    Now lets install CUDA:

    $ sudo dpkg -i cuda-repo-ubuntu1604-8-0-local-ga2_8.0.61-1_amd64.deb
    $ sudo apt-get update
    $ sudo apt-get install cuda
    

    You can then delete the file you downloaded.

  2. Just in case you haven’t installed git yet, let’s try and install it. If it is already installed nothing bad will happen, and you practiced typing.
    $ sudo apt-get install git
  3. For convenience, I like to place these directories on my desktop. Here’s how to do that, and then change directory into it.
    $ mkdir ~/Desktop/vertcoin-ccminer/
    $ cd ~/Desktop/vertcoin-ccminer
  4. Now pull down the source code into this directory and change directory again into a subdirectory that git created.
    $ git clone https://github.com/tpruvot/ccminer.git
    $ cd ccminer
    
  5. Pull down some more supporting libraries before we compile this bad boy. You could have done this from another directory or at an earlier step. But makes sense here conceptually as we need it for the next following step.
    $ sudo apt-get install libcurl4-openssl-dev libssl-dev libjansson-dev automake autotools-dev build-essential
    
  6. This is where we start getting into voodoo. You need to make sure you cut an paste the following commands properly – particularly the configure one. Typos will cause things to fail. Between each of the following commands you will see lots of configuration code go. I comment each of the lines with a # – that means ubuntu will ignore what follows it (i.e. it won’t execute it). If you want to high-level view of the gory details on compilation you can click here.
    $ ./autogen.sh # this builds a configure script tuned for your system
    $ ./configure CFLAGS="-O3 -Wall -march=native" # this sets compilation flags in the script autogen made
    $ ./build.sh # lots of compilation commands should fly by, and when done you should be returned to a prompt with no errors
    
  7. Awesome! Now we just start mining!You can try the following briefly and see that it works. Hopefully you will see progress.
    $ ./ccminer -a lyra2v2 -o stratum+tcp://208.113.166.44:9171 -u VrdExKvWGUct8o1icbsrPSt92BUGWSxhax -p passwordnotneeded

    Once it starts going, you need to hit CTRL+C and/or CTRL+X to cancel.

    Your next step is to change the bolded fields to be a mining pool you like (though I’m partial to the one listed) and create a wallet for yourself.

SSH – Adding Public Key Authentication for Ubuntu 16.04 LTS

  1. Check if the public key already exist on your local machine.
    $ locate id_rsa

    If they do, go to the step the copies the public key to your destination machine.

  2. If the public key doesn’t already exist, execute
    $ ssh-keygen

    For my purposes, I hit -enter- then -enter- again. It shows a pretty picture. Now we’ve got public and private keys.

  3. Now, it is time to deploy the public key to the destination servers of interest.
    $ ssh-copy-id userX@server1_ip
    $ ssh-copy-id userY@server2_ip

    If your ssh-copy-id does not work (like my Mac), then you have to manually cut and paste the contents of the local ~/.ssh/id_rsa.pub to the destination’s ~/.ssh/authorized_keys.

  4. Then, restrict access for all the authorized_keys files on all your servers.
    $ chmod 600 ~/.ssh/authorized_keys

    Tip: On one of my machines the owner of the authorized_keys was root and because of that, the public key authentication didn’t work and I was entering passwords. Had to chown it the desired user. This link pointed me in the right direction.

  5. Further lock things down by disabling password authentication on your destination ssh server.
    $ sudo nano /etc/ssh/sshd_config

    and then make sure this line exists

    PasswordAuthentication no

    To lock down at certain times of the day, check out this out.

  6. If you are a home internet user, it is likely that your IP address may change. Luckily, there are services around that let you publish your IP address to a known server. These servers are called dynamic DNS hosting. For my purposes I went with Duck DNS. It is simple to sign-up with and they provide detailed instructions under their “install” tab.

Steps condensed from this reference.

Steps for Desktop Sharing on Ubuntu 16.04 LTS

In order to view the desktop of another Ubuntu 16.04 LTS machine follow these steps.  I performed these actions to make my life easier on my home cryptocoin mining network – this is not the most secure method. But, it works and I can get to my machines.  I perform these steps right after building a new box.

Unencrypted Home Directory Pre-requisite: If you want to have your remote machine auto-login so that you can remote into it whenever you need…you will have to unencrypted your home directory if it is encrypted. Follow this link and steps (PDF Version). Pre-pre-requisite: If you do indeed need to perform these unencryption steps, you will need to know how to create another sudo user (link PDF Version)

If you intend on running your “remote” machine as headless (i.e. no monitor) you may need to follow my steps to fake the box out to think it has a monitor connected. If you have a rig that you see runs XOrg at high CPU and you aren’t mining, you may be suffering from a headless server that needs to be tricked!

From your “viewing” machine:

  1. ssh to your “sharing” machine
  2. See if vino-server is installed
    $ locate vino-server
  3. If the above comes back blank then:
    $ sudo apt-get install vino
  4. Now we have to configure the vino-server
    $ export DISPLAY=:0.0
    $ dbus-launch gsettings set org.gnome.Vino enabled true
    $ dbus-launch gsettings set org.gnome.Vino prompt-enabled false
    $ dbus-launch gsettings set org.gnome.Vino authentication-methods "['vnc']"
    $ dbus-launch gsettings set org.gnome.Vino vnc-password "$(echo -n "YOU-ENTER-A-PASSWORD-FOR-DESKTOP-SHARING-HERE" | base64)"
    $ dbus-launch gsettings set org.gnome.Vino require-encryption true
    

    Notes:

    • The first bolded above is the area you need to enter the password you will enter from the client machine
    • Regarding the bold field under encryption: if you are connecting from another Ubuntu machine leave it as “true.” If you are connecting from a Mac…then switch it to “false.” On macs use the program called “screen sharing” that ships with OS X (hit command+space to bring up spotlight and search for “screen sharing”).
    • The dubs-launch command is needed because we are executing this remotely from shell prompt
    • The first command related to the DISPLAY variable needs some extended discussion. First, to see what value it holds you can run “echo $DISPLAY”. The format of the display variable is hostname:display.screen (where the hostname is usually omitted, both display and screen start at 0, and if screen is not provided it defaults to 0). Now in this context, the definition of “display” is nuanced. It conceptually means a collection of monitors that share one set of input devices (e.g. mouse and keyboard). “screen” just means the monitor number for the “display” of interest. Ref
  5. This is how you run it
    $ /usr/lib/vino/vino-server

    Did it give you an error…something like “Could not connect: Connection refused Cannot open display:”? If so continue to the next step.

  6. In order to start vino-server remote machine must be showing some sort of graphical interface. The remote machine cannot be stuck on the login screen. To work around this we need to configure the remote machine to automatically login. If you do happen to try running /usr/lib/vino/vino-server without doing this you will receive
  7. To autologin:
    $ sudo mkdir /etc/lightdm/lightdm.conf.d
    $ sudo nano /etc/lightdm/lightdm.conf.d/50-myconfig.conf
    [SeatDefaults]
    autologin-user=USERNAME
    

    Reference

  8. Let’s configure vino-server to autostart. I tried a couple of different methods, and the following was the easiest and cleanest. Doing this at the command line will actually populate entries on the “Application Autostart” tab of the “Session and Startup” application in the GUI.
    $ mkdir ~/.config/autostart
    $ cd ~/.config/autostart
    $ nano Vino.desktop
    [Desktop Entry]
    Name=Vino Server
    Exec=/usr/lib/vino/vino-server
    Type=Application
    

    In my case I have a Claymore95 miner, and I want it to autostart too!

    $ nano Claymore.desktop
    

    Now, the following shows what the GUI will populate

    [Desktop Entry]
    Encoding=UTF-8
    Version=0.9.4
    Type=Application
    Name=Claymore
    Comment=mining
    Exec=/bin/bash -c "sleep 10 && cd /usr/local/claymore95/ && nohup ./mine.sh &"
    OnlyShowIn=XFCE;
    StartupNotify=false
    Terminal=false
    Hidden=false
    

    A helpful reference for the autostart step

  9. Let’s restart the server machine!
    $ sudo shutdown -r now
  10. On the client machine, you need to download the remote viewer. From the Start menu, run the Software application. Within, download the “Remote Desktop Viewer.”
  11. Now, at this point the server should be restarted. You can now run the “Remote Desktop Viewer” to connect. You should get prompted for the password you established above, and you should see the shared remote desktop!